|
SUBJECT:
Art - Printmaking
GRADE LEVEL:
Art Level II
TEKS:
|
117.54
(1) perception (A & B)
(2) creative expression / performance (A)
(3) historical / cultural heritage (A)
(4) response / evaluation (B)
|
OBJECTIVE:
Students will analyze
the block prints of Kiyoshi Suito and discuss the appearance and techniques
in block printing.
Students will create
their own artwork using a reductive block process
MATERIALS:
- See images below
- Student examples
(optional)
- Linoleum
- Lino cutters
and handles
- Water soluble
printing ink
- Brayers
- Printing paper
- Burnisher or
Printing Press
- Iron (optional)
- Sharpening stone
(optional)
- Colored markers
or crayons
- Water bottle
- Photographs
of Kiyoshi Suito's Woodcut Prints ( see images below)
Time Required: 2
1/2 to 3 weeks (12 to 15 class periods)
|
|
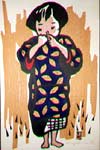
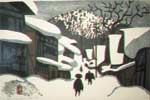
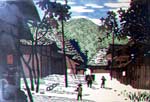
DISCUSSION:
Show the three examples
of Suito's wood block prints to the students and use the following questions
to examine the work.
- What subjects
are represented in each picture?
- Are the images
complex or simple?
- How many colors
are there in each picture?
- Are the colors
flat or do they have variation?
- How is the composition
organized?
- Do you see any
texture or patterns in the pictures?
ASSIGNMENT:
Create a reductive
block in an edition of 5, using the woodcuts of Kiyoshi Suito as inspiration
and instructive example.
Explanation of Reductive
Block Print:
A reductive block
print is a means of creating different images on the same block by a
process of elimination. Because each cutting alters the printing image,
the artist must have a clear idea in mind of the steps needed to produce
the final print and must plan the cutting accordingly.
Any areas in the
design that are to remain the color of the paper are cut from the block
first, and the remaining areas are printed with the lightest color such
as yellow. The entire edition must be printed with the yellow at this
time. Next, the areas that are to remain yellow are cut from the block
and the next darkest color is printed. Continue the process until all
colors are completed. Because the colors are printed over each other,
it is best to work from light to dark or more opaque (white and color
with white added can appear very opaque and therefore used in a later
cutting).
PROCEDURE:
- Plan your idea.
Create at least three thumbnail sketches of ideas. Choose the best
one and create a rough draft that is the same size as the linoleum.
Critique the rough draft and make necessary corrections until you
are satisfied with the drawing. Stress simplified shapes, use of space,
and pattern.
- Make a Xerox
copy(s) of the rough draft and plan the colors; decide on 4 to 5 colors
to use in the print. (one color will be the color of the paper and
the others will be ink). Make a color rough draft.
- Transfer the
drawing from the rough draft to the linoleum with carbon paper and
then trace the lines again on the linoleum with a sharpie marker.
(Carbon lines will wear off before the project is complete)
- Fill in the first
area to be cut (the color of the paper) with a sharpie marker to insure
mistakes are not made in the cutting.
- Carve away this
area, being careful to always cut away from your body and hand. (Heating
the linoleum with an iron makes the cutting much easier and safer.)
- Ink the linoleum
with the first and lightest color. Use the ink in a thin layer to
prevent too much texture. Thick ink can be thinned by spraying it
with a little water.
- Lay the inked
linoleum on the paper and trace around the edges to register the print.
Write top on both the paper and the back of the linoleum to insure
the plate is turned the correct way for the remaining prints.
- Flip the linoleum
over and apply pressure to the paper to transfer the ink. Lift the
corners of the paper away from the linoleum to check the print. Add
more ink if needed and continue pressing until you are satisfied with
the transfer. Print the entire edition with this first color. (If
the ink dries before you are finished printing it will tear the paper.
Lightly mist the linoleum between prints.)
- Clean the linoleum
after the printing is complete and allow it to dry.
- With a Sharpie
marker, fill in the areas of the linoleum that will remain the color
you just completed printing and carve that area away.
- Ink the linoleum
with the second lightest color and place the linoleum on the paper
aligning it with the registration marks. Print the edition following
the instructions above. (It may become necessary to ink the linoleum
a little thicker with each new color, because of the texture build-up).
- Follow the above
steps until all colors are printed.
- Sign, title,
and edition number the prints.
SUGGESTIONS:
- Sometimes textures
left by accidentally or purposely inking and printing areas that were
cut away can add interest to the print.
- Careful registration
is important, but outlines left from the registration being slightly
off can be a positive effect.
- Plan a full class
period for each print. Do not start in the middle of the period or
you will not be able to complete the edition. Have a backup project
for the students to work on if they are waiting.
CLOSURE:
Place all the prints
on the wall and critique the work.
Discuss what the students learned in the process and what they would
do differently.
Did they enjoy the project?
What are they planning to do with the prints?
Do they have a better appreciation of printmaking techniques?
RESOURCES:
Read about Kiyoshi
Suito
View page of Student Examples
Publications:
Katz, Elizabeth L., Lankford, E. Louis, Plank, Jan D. Themes and
Foundations of Art. St. Paul: West, 1995. pp. 182-83. (Slide # 33
ancillary material).
Ragans, Rosalind.
Art Talk. Columbus, Ohio: Glencoe,1995., pp. 11-13.
|